One of the requirements of the k8s networking model is that all pods running in a host are able to communicate with each other. This flat networking model posses some security challenges in clusters that are multi-tenanted. So for an MSP running multiple customer applications on a single cluster; this can lead to customers accessing each other’s service. Even in a setup where multiple business units share a common cluster having a network security policy is needed from a goverance and isolation perspective. Project calico aims to achieve two main objectives.
- It can provide highly scalable CNI based networking plugin for k8s
- It can provide network policy solution that can enforce network policies at a pod level
In this post we will stand up a mircok8s cluster on Ubuntu 20.04 and install calico on top of that. Once we have calico installed we will implement network policies to provide pod to pod security policies.
Installing Microk8s
- Install Microk8s w/ calico node and controller via the edge/ha-preview channel, set permissions and enable DNS
$ sudo snap install microk8s --classic --channel=latest/edge/ha-preview
microk8s (edge) v1.19.2 from Canonical✓ installed

$ alias kubectl='microk8s kubectl'
$ sudo usermod -a -G microk8s $USER
$ sudo chown -f -R $USER ~/.kube
$ su - $USER
$ microk8s enable dns
Enabling DNS
Applying manifest
serviceaccount/coredns created
configmap/coredns created
deployment.apps/coredns created
service/kube-dns created
clusterrole.rbac.authorization.k8s.io/coredns created
clusterrolebinding.rbac.authorization.k8s.io/coredns created
Restarting kubelet
DNS is enabled

$ microk8s kubectl get pods -A
NAMESPACE     NAME                                      READY   STATUS    RESTARTS   AGE
kube-system   coredns-86f78bb79c-758zc                  1/1     Running   0          74s
kube-system   calico-node-v6snk                         1/1     Running   1          5m
kube-system   calico-kube-controllers-847c8c99d-vz8c7   1/1     Running   0          5m

$ microk8s status --wait-ready
microk8s is running
high-availability: no
  datastore master nodes: 127.0.0.1:19001
  datastore standby nodes: none
addons:
  enabled:
    dns                  # CoreDNS
    ha-cluster           # Configure high availability on the current node
  disabled:
    ambassador           # Ambassador API Gateway and Ingress
    cilium               # SDN, fast with full network policy
    dashboard            # The Kubernetes dashboard
    fluentd              # Elasticsearch-Fluentd-Kibana logging and monitoring
    gpu                  # Automatic enablement of Nvidia CUDA
    helm                 # Helm 2 - the package manager for Kubernetes
    helm3                # Helm 3 - Kubernetes package manager
    host-access          # Allow Pods connecting to Host services smoothly
    ingress              # Ingress controller for external access
    istio                # Core Istio service mesh services
    jaeger               # Kubernetes Jaeger operator with its simple config
    knative              # The Knative framework on Kubernetes.
    kubeflow             # Kubeflow for easy ML deployments
    linkerd              # Linkerd is a service mesh for Kubernetes and other frameworks
    metallb              # Loadbalancer for your Kubernetes cluster
    metrics-server       # K8s Metrics Server for API access to service metrics
    multus               # Multus CNI enables attaching multiple network interfaces to pods
    prometheus           # Prometheus operator for monitoring and logging
    rbac                 # Role-Based Access Control for authorisation
    registry             # Private image registry exposed on localhost:32000
storage # Storage class; allocates storage from host directory- Install and configure calicoctl. This will allows us to create, read, update, and delete Calico objects from the command line.
$ kubectl apply -f https://docs.projectcalico.org/manifests/calicoctl.yaml
pod/calicoctl created- Run the kubectl command below output of the calico profiles
$ kubectl exec -ti -n kube-system calicoctl -- /calicoctl get profiles -o wide
NAME                                                 LABELS
projectcalico-default-allow
kns.kube-system                                      pcns.projectcalico.org/name=kube-system
kns.kube-public                                      pcns.projectcalico.org/name=kube-public
kns.kube-node-lease                                  pcns.projectcalico.org/name=kube-node-lease
kns.default                                          pcns.projectcalico.org/name=default
ksa.kube-system.replication-controller               pcsa.projectcalico.org/name=replication-controller
ksa.kube-system.pod-garbage-collector                pcsa.projectcalico.org/name=pod-garbage-collector
ksa.kube-system.generic-garbage-collector            pcsa.projectcalico.org/name=generic-garbage-collector
ksa.kube-system.job-controller                       pcsa.projectcalico.org/name=job-controller
ksa.kube-system.deployment-controller                pcsa.projectcalico.org/name=deployment-controller
ksa.kube-system.statefulset-controller               pcsa.projectcalico.org/name=statefulset-controller
ksa.kube-system.ttl-controller                       pcsa.projectcalico.org/name=ttl-controller
ksa.kube-system.pvc-protection-controller            pcsa.projectcalico.org/name=pvc-protection-controller
ksa.kube-system.endpointslicemirroring-controller    pcsa.projectcalico.org/name=endpointslicemirroring-controller
ksa.kube-system.service-account-controller           pcsa.projectcalico.org/name=service-account-controller
ksa.kube-system.replicaset-controller                pcsa.projectcalico.org/name=replicaset-controller
ksa.kube-system.horizontal-pod-autoscaler            pcsa.projectcalico.org/name=horizontal-pod-autoscaler
ksa.kube-system.calico-node                          pcsa.projectcalico.org/name=calico-node
ksa.kube-system.calico-kube-controllers              pcsa.projectcalico.org/name=calico-kube-controllers
ksa.kube-system.certificate-controller               pcsa.projectcalico.org/name=certificate-controller
ksa.kube-system.node-controller                      pcsa.projectcalico.org/name=node-controller
ksa.kube-system.pv-protection-controller             pcsa.projectcalico.org/name=pv-protection-controller
ksa.kube-system.endpoint-controller                  pcsa.projectcalico.org/name=endpoint-controller
ksa.kube-system.endpointslice-controller             pcsa.projectcalico.org/name=endpointslice-controller
ksa.kube-system.cronjob-controller                   pcsa.projectcalico.org/name=cronjob-controller
ksa.kube-system.service-controller                   pcsa.projectcalico.org/name=service-controller
ksa.kube-system.daemon-set-controller                pcsa.projectcalico.org/name=daemon-set-controller
ksa.kube-system.clusterrole-aggregation-controller   pcsa.projectcalico.org/name=clusterrole-aggregation-controller
ksa.kube-system.persistent-volume-binder             pcsa.projectcalico.org/name=persistent-volume-binder
ksa.kube-system.attachdetach-controller              pcsa.projectcalico.org/name=attachdetach-controller
ksa.kube-system.expand-controller                    pcsa.projectcalico.org/name=expand-controller
ksa.kube-system.resourcequota-controller             pcsa.projectcalico.org/name=resourcequota-controller
ksa.kube-system.namespace-controller                 pcsa.projectcalico.org/name=namespace-controller
ksa.kube-system.disruption-controller                pcsa.projectcalico.org/name=disruption-controller
ksa.kube-system.default                              pcsa.projectcalico.org/name=default
ksa.kube-public.default                              pcsa.projectcalico.org/name=default
ksa.kube-node-lease.default                          pcsa.projectcalico.org/name=default
ksa.default.default                                  pcsa.projectcalico.org/name=default
ksa.kube-system.coredns                              pcsa.addonmanager.kubernetes.io/mode=Reconcile,pcsa.k8s-app=kube-dns,pcsa.kubernetes.io/cluster-service=true,pcsa.projectcalico.org/name=coredns
ksa.kube-system.calicoctl                            pcsa.projectcalico.org/name=calicoctl

# Create alias to the command above
alias calicoctl="kubectl exec -i -n kube-system calicoctl -- /calicoctl"
Implementing network policy with calico
Now that we have calico up and running we will implement networking policy using the demo on the calico website (https://docs.projectcalico.org/security/tutorials/kubernetes-policy-demo/kubernetes-demo)
- Create the frontend, backend, client, and management-ui apps.
$ kubectl create -f https://docs.projectcalico.org/security/tutorials/kubernetes-policy-demo/manifests/00-namespace.yaml
$ kubectl create -f https://docs.projectcalico.org/security/tutorials/kubernetes-policy-demo/manifests/01-management-ui.yaml
$ kubectl create -f https://docs.projectcalico.org/security/tutorials/kubernetes-policy-demo/manifests/02-backend.yaml
$ kubectl create -f https://docs.projectcalico.org/security/tutorials/kubernetes-policy-demo/manifests/03-frontend.yaml
$ kubectl create -f https://docs.projectcalico.org/security/tutorials/kubernetes-policy-demo/manifests/04-client.yaml
- Check that all the pods are up and running
$ kubectl get pods --all-namespaces
NAMESPACE       NAME                                      READY   STATUS    RESTARTS   AGE
kube-system     coredns-86f78bb79c-758zc                  1/1     Running   0          50m
kube-system     calico-node-v6snk                         1/1     Running   1          54m
kube-system     calico-kube-controllers-847c8c99d-vz8c7   1/1     Running   0          54m
kube-system     calicoctl                                 1/1     Running   0          10m
management-ui   management-ui-rbdqx                       1/1     Running   0          37s
stars           backend-7h9hf                             1/1     Running   0          36s
stars           frontend-psjgc                            1/1     Running   0          34s
client          client-72nxv                              1/1     Running   0          32s
The management UI runs as a NodePort Service on Kubernetes, and shows the connectivity of the Services in this example.
You can view the UI by visiting http://localhost:30002 in a browser.
Once all the pods are started, they should have full connectivity. We can see this by visiting the UI. Each service is represented by a single node in the graph.
Once all the pods are started, they should have full connectivity. You can see this by visiting the UI. Each service is represented by a single node in the graph.
backend -> Node “B”
frontend -> Node “F”
client -> Node “C”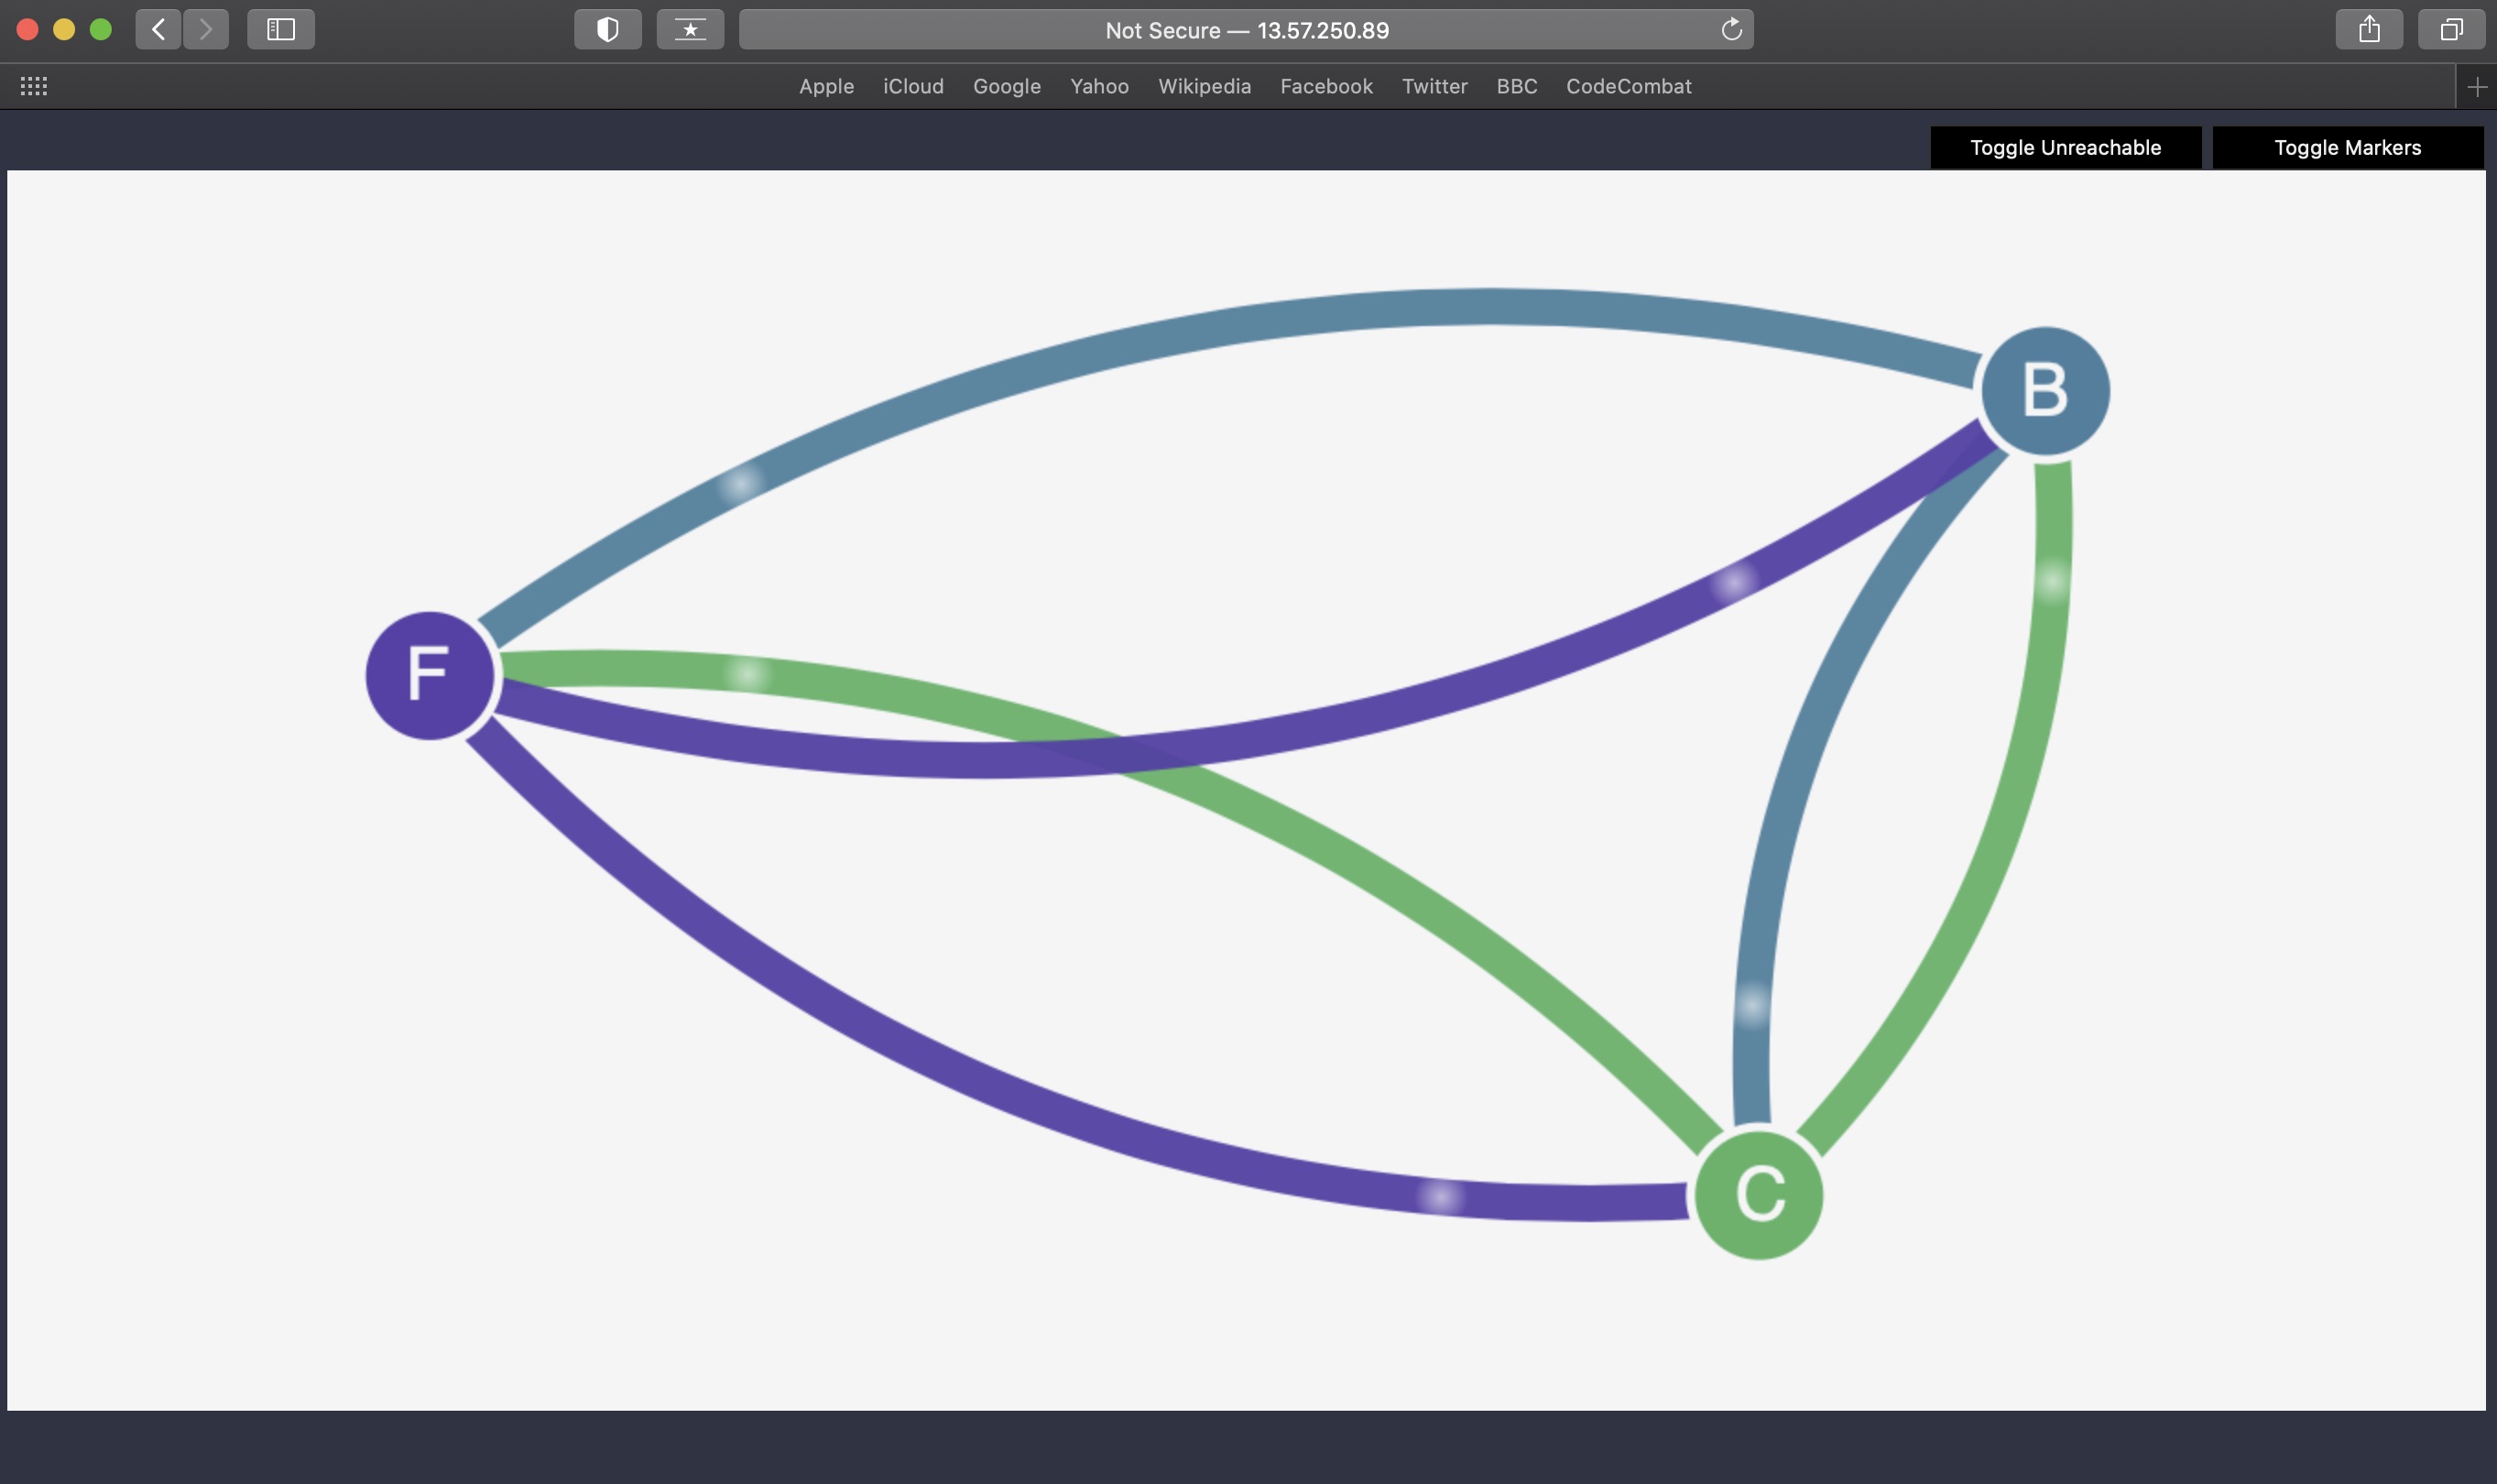
- Enable network isolation by running the following commands. This will prevent all access to the frontend, backend, and client services.
$ kubectl create -n stars -f https://docs.projectcalico.org/security/tutorials/kubernetes-policy-demo/policies/default-deny.yaml
$ kubectl create -n client -f https://docs.projectcalico.org/security/tutorials/kubernetes-policy-demo/policies/default-deny.yaml- Confirm isolation
Refresh the management UI (it may take up to 10 seconds for changes to be reflected in the UI). Now that we’ve enabled isolation, the UI can no longer access the pods, and so they will no longer show up in the UI.

- Allow the UI to access the services using network policy objects
$ kubectl create -f https://docs.projectcalico.org/security/tutorials/kubernetes-policy-demo/policies/allow-ui.yaml
$ kubectl create -f https://docs.projectcalico.org/security/tutorials/kubernetes-policy-demo/policies/allow-ui-client.yaml
- Create the backend-policy.yaml file to allow traffic from the frontend to the backend
$ kubectl create -f https://docs.projectcalico.org/security/tutorials/kubernetes-policy-demo/policies/backend-policy.yamlRefresh the UI. You should see the following:
The frontend can now access the backend (on TCP port 6379 only).
The backend cannot access the frontend at all.
The client cannot access the frontend, nor can it access the backend.
7. Expose the frontend service to the client namespace
$ kubectl create -f https://docs.projectcalico.org/security/tutorials/kubernetes-policy-demo/policies/frontend-policy.yamlThe client can now access the frontend, but not the backend. Neither the frontend nor the backend can initiate connections to the client. The frontend can still access the backend.

To use Calico to enforce egress policy on Kubernetes pods, see the advanced policy demo (https://docs.projectcalico.org/security/tutorials/kubernetes-policy-advanced).